Whether you’re a business or an individual planning to move from your legacy system to Salesforce, you might wonder, “How do I prepare for data migration that’s best for my needs and ensures no data loss?” If you’re looking for guidance or Salesforce data migration best practices, you’ve come to the right place.
Whether you’re migrating from an external system to Salesforce or just beginning to plan your move, this guide to Salesforce data migration best practices will help you navigate the process smoothly and efficiently. Following these steps will ensure your migration is successful and your data remains secure and organized.
That said, it’s always recommended to work with an experienced Salesforce consultant to avoid pitfalls and make the most of your Salesforce investment.
Let’s get started! But before diving into the steps, let’s first thoroughly understand what Salesforce data migration is and why it’s so critical.
What is Salesforce Data Migration?
Salesforce Data Migration is the process of transferring data from existing systems like legacy CRMs, spreadsheets, or databases into Salesforce. This ensures your data is accessible and functional within the Salesforce platform.
The migration process includes assessing, cleansing, and mapping data to guarantee accuracy, consistency, and compatibility with Salesforce. By organizing data before migration, businesses create a strong foundation for efficient workflows and better decision-making.
Data migration is critical because clean, accurate, and organized data is the backbone of seamless operations. It minimizes errors, improves productivity, and ensures your team has reliable information for day-to-day tasks.
Without proper data migration, businesses risk inefficiencies, inaccuracies, and wasted resources. A successful migration helps unlock the full potential of Salesforce, driving smarter decision-making and improving customer relationships with a trustworthy data ecosystem.
Salesforce Data Migration Best Practices
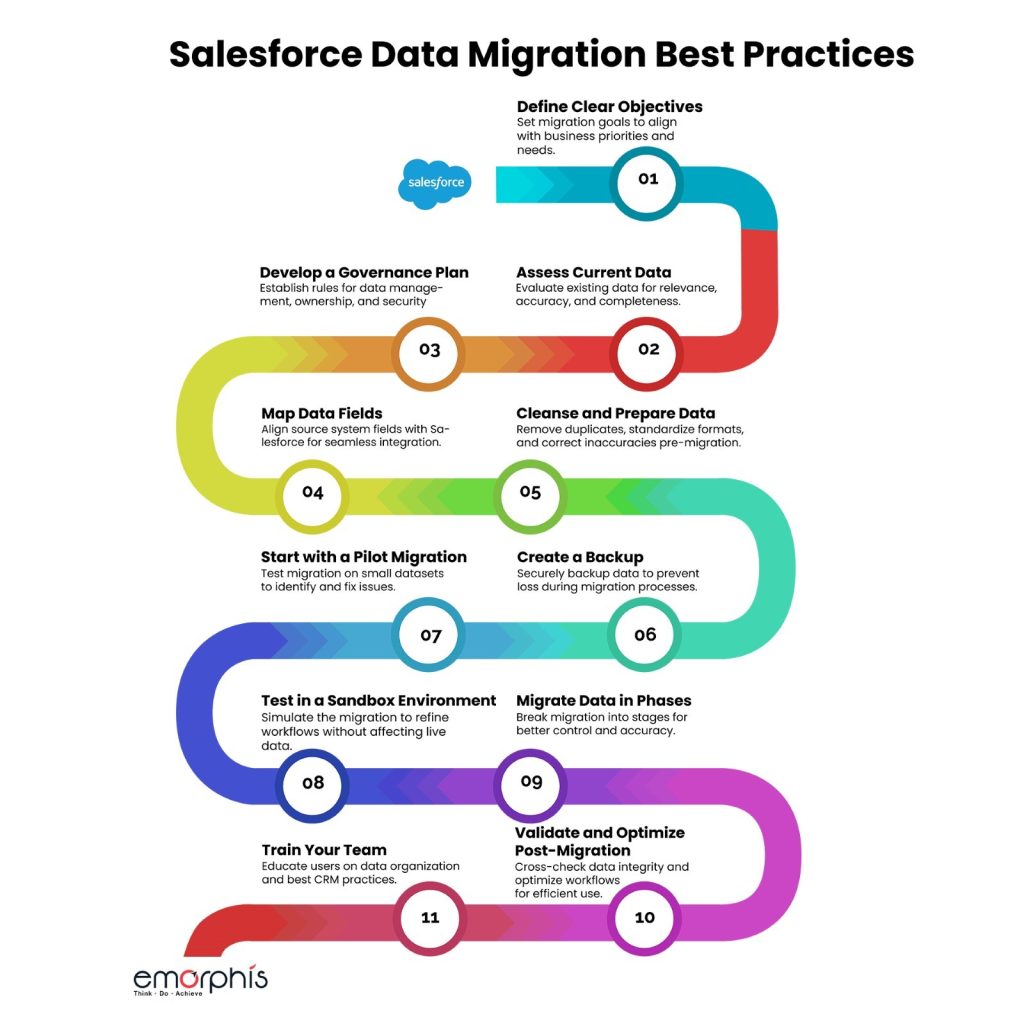
Step 1: Understand Your Objectives
Before you dive in, take a moment to reflect. Why are you migrating your data? What do you want to achieve? This is the foundation of your migration journey.
How to Do It:
- List your goals (e.g., streamlining operations, improving reporting).
- Define what success looks like (e.g., clean, accessible data in Salesforce).
- Align with your stakeholders so everyone is on the same page.
Example: If your goal is to improve sales team efficiency, ensure the migration includes customer contacts, sales histories, and pipeline data.
Step 2: Assess Your Current Data
Now, take a look at the data you already have. This is like examining all the pieces of a puzzle before putting them together. Identify what’s useful, outdated, or irrelevant.
How to Do It:
- Conduct a data audit to review what’s stored in your existing systems.
- Identify redundant records, missing information, and inconsistent formats.
- Mark data that is critical for migration and data that can be archived.
Tip: Use tools like Excel or specialized data auditing software to organize and categorize your data.
Step 3: Develop a Data Governance Plan
Think of this step as creating the rules of the game. A data governance plan ensures everyone knows how to handle the data during and after the migration.
How to Do It:
- Assign roles for data management (e.g., who owns what data).
- Set rules for naming conventions, data formatting, and duplication handling.
- Define security protocols to protect sensitive data.
Example: Standardize customer names to be “First Name Last Name” instead of varying formats like “LAST, First.”
Step 4: Map Your Data Fields
Now, you’ll create a blueprint for your migration. This is where you align fields from your old system with fields in Salesforce.
How to Do It:
- List all fields in your current system (e.g., “Customer Name,” “Order ID”).
- Match these to corresponding fields in Salesforce (e.g., “Account Name,” “Opportunity ID”).
- Identify any fields that require transformation (e.g., splitting full names into first and last names).
Pro Tip: Create a field mapping document to keep track of these relationships and transformations.
Step 5: Clean Your Data
This step is like cleaning your room before inviting guests over—it makes everything more efficient and organized.
How to Do It:
- Remove duplicate records, fix inaccuracies, and standardize formats.
- Use tools like Salesforce Data Loader to automate cleansing.
- Validate your data to ensure it’s accurate and complete.
Example: Delete duplicate customer records that have been entered multiple times with slight variations.
Step 6: Create a Backup of Your Data
Before you start migrating, ensure you have a backup. Think of this as your safety net in case anything goes wrong.
How to Do It:
- Export your data into a secure location, such as a cloud drive or external database.
- Ensure the backup includes all critical records, just in case.
Tip: Label the backup with a clear date and time for easy retrieval.
Step 7: Start with a Pilot Migration
Don’t jump in with everything. Start small and test the water. A pilot project helps you identify any issues without risking your entire data set.
How to Do It:
- Select a small, manageable dataset, such as one department or category.
- Migrate this data and review the results for accuracy and functionality.
Example: Migrate only customer contacts first to ensure the process works as expected.
Step 8: Test in a Sandbox Environment
Think of the sandbox as your rehearsal stage. It’s where you can practice migration without impacting your live Salesforce environment.
How to Do It:
- Run the migration in Salesforce’s sandbox environment.
- Validate data accuracy, test workflows, and check for errors.
- Adjust your processes based on what you learn.
Pro Tip: Pay extra attention to edge cases like custom fields and unique data relationships.
Step 9: Migrate Data in Phases
It’s finally time to migrate your data—but don’t rush it. Break it into smaller phases for better control and accuracy.
How to Do It:
- Start with non-critical data like archived accounts or past orders.
- Gradually move to high-priority data like active leads and opportunities.
- Validate each phase before proceeding to the next.
Example: Phase 1: Contacts; Phase 2: Opportunities; Phase 3: Invoices.
Step 10: Validate and Optimize Post-Migration
Once the migration is complete, double-check everything. Validation ensures that the data in Salesforce matches what was in your old system.
How to Do It:
- Compare record counts, field values, and relationships between systems.
- Use Salesforce reports to check for discrepancies.
- Optimize workflows based on the new data structure.
Example: If an order ID doesn’t match a customer record, investigate and fix the issue promptly.
Step 11: Train Your Team and Monitor Performance
Finally, teach your team how to use the newly migrated data effectively. This step ensures your hard work pays off.
How to Do It:
- Host training sessions to demonstrate how to access and manage data in Salesforce.
- Provide ongoing support and resources for troubleshooting.
- Monitor system performance and collect feedback for further improvements.
Pro Tip: Set up regular check-ins to review how teams are using the system and address any challenges.
Also, check out this helpful blog: Salesforce Change Management Strategies and Best Practices
Now let’s understand it with an example:
Example: Data Migration from Zoho CRM to Salesforce CRM

Let’s walk through the Salesforce data migration best practices, using the example of migrating from Zoho CRM to Salesforce CRM. Following these steps ensures your data is clean, organized, and optimized for your new CRM system.
Step 1: Define Objectives
So, while migrating from Zoho CRM to Salesforce, start by defining your goals. Are you aiming to streamline sales tracking, improve reporting accuracy, or centralize customer data?
Clearly outline what you want to achieve and decide which data sets—such as active customer records, leads, or opportunities—are essential for migration. This clarity helps prioritize your efforts and ensures the migration aligns with your business objectives.
For instance, if enhancing sales insights is your goal, focus on migrating complete and accurate customer interactions.
Step 2: Assess Current Data
When migrating from Zoho CRM to Salesforce, it’s essential to evaluate the quality of your existing data. Conduct a thorough audit to identify duplicates, outdated records, and incomplete information. This step ensures that only valuable and relevant data is migrated.
For example, you might find old leads that no longer hold potential—these can be archived to keep your new system clean and efficient.
Step 3: Develop a Governance Plan
A data governance plan ensures consistency and accountability throughout the migration process.
Assign roles for data management, such as a sales manager overseeing customer records, and establishing naming conventions and formatting standards.
For instance, ensure all phone numbers follow the same format. This structure helps maintain data accuracy during and after migration.
Step 4: Map Data Fields
Mapping data fields ensures that information from Zoho aligns correctly with Salesforce.
Create a detailed mapping document to match fields like “Client Name” in Zoho to “Account Name” in Salesforce. Address discrepancies, such as splitting combined fields (e.g., “Full Name” into “First Name” and “Last Name”).
This step prevents data mismatches and ensures smooth integration.
Step 5: Cleanse and Prepare Data
Prepare your data by removing duplicates, correcting inaccuracies, and standardizing formats. Use tools like Data Loader to automate this process where possible.
For example, ensure all email addresses are formatted correctly, and inactive customer records are removed. Clean data ensures your Salesforce system operates efficiently post-migration.
Step 6: Create a Backup
Before initiating the migration, create a backup of your Zoho CRM data. Export all records and store them securely to protect against potential issues.
For instance, if there’s an unexpected error during migration, you’ll have a reliable copy to restore from. A backup ensures data security and peace of mind.
Step 7: Start with a Pilot Migration
Test the process by migrating a small subset of data, such as 100 customer records, to validate the workflow. This allows you to identify and fix issues before scaling to the full migration.
For example, if you notice a custom field isn’t mapping correctly, adjustments can be made without affecting the larger dataset.
Step 8: Test in a Sandbox Environment
Use Salesforce’s sandbox environment to simulate the migration process and resolve any issues without affecting live data.
For instance, test how workflows and relationships are impacted when opportunities are migrated. This step ensures a seamless live migration.
Step 9: Migrate Data in Phases
Break the migration into smaller phases to minimize risk. Start with non-critical data, like archived records, and progress to high-priority items like active leads and opportunities.
For example, migrate customer contacts first, validate accuracy, and then proceed to migrate sales pipelines.
Step 10: Validate and Optimize Post-Migration
After migration, validate the data to ensure everything transferred correctly. Cross-check records, run Salesforce reports, and reconcile discrepancies.
For example, verify that account names and related opportunities match their original records in Zoho. This step ensures your system is ready for use.
Step 11: Train Your Team and Monitor Performance
Train your team on how to use the new Salesforce system effectively. Focus on navigating the new data structure and workflows.
For instance, demonstrate how to access customer histories and use reporting tools. Ongoing monitoring ensures optimal performance and user adoption.
Also, explore this blog if your business is considering customization – Salesforce Customization Best Practices
Conclusion
Data migration is more than just a technical task—it’s a strategic move that sets your organization up for success. By following these 11 structured steps for Salesforce Data Migration Best Practices, you can ensure your Salesforce CRM is powered by clean, accurate, and actionable data.
Need expert guidance for your data migration? Connect with a Salesforce consultant today to get started!
Start the conversation and let our experts take care of your data migration seamlessly!


